B&W Film Fixing & Washing
B&W RC Paper Fixing & Washing
Fixing, Washing & Toning Fine B&W Photographs
Processing Your Materials Correctly
©Copyright 1989 thru 2008 David Kachel
This article Has Never Been Published. It has previously been used only for workshop instruction.
The greatest technical difficulty that faces and has always faced photographers is that of permanence. From the beginnings of photography when Fox-Talbot was marginally successful at fixing the photographic image with table salt, to the present when plastic papers tend to yellow and crack, color dyes quickly fade, and a wide variety of outside forces work to destroy what we have labored so hard to produce, photographers have continuously fought to find ways to make their images more permanent.
Photographic permanence is a subject that requires several articles for adequate treatment, but the correct washing of photographic materials is by far one of the most important aspects of photographic permanence and is therefore the subject of this article. So much has been learned in the past several years about washing and how it relates to the longevity of photographs that it has become necessary for us to change our approach to the washing of photographic materials almost completely.
No discussion of the correct washing of photographic materials can be adequate without first mentioning correct fixation. The reason for this is that it is not possible to effectively wash photographic materials of any kind unless they have first been properly fixed.
The removal of undeveloped silver halide from a photographic emulsion by fixation is a complicated process. The unused silver salts contained in the emulsion and the sodium thiosulphate (fixer) (rapid fixers are composed of ammonium thiosulphate) must go through dozens of chemical changes together before forming compounds capable of being washed from the emulsion or paper fibers. The interim compounds formed before the fixation process is complete cannot be washed from photographic materials regardless of how long they are washed or how much water is used. The fixation process must therefore be absolutely complete, before one can wash the film or print successfully.
The secret to correct fixation of any photographic material is in knowing that a large supply of very fresh fixer is necessary to effectively carry out the fixation process. Fixer that is far too stale to adequately complete all the steps of fixation is still more than strong enough to begin a process it cannot finish by clearing the emulsion (i.e., removing the milky appearance) and thereby make the film or paper appear to have been correctly fixed when it has not. In order for the unused silver and the thiosulphate compounds formed with it to progress through all of the necessary steps for complete fixation, adequate quantities of fresh fixer must be present to react chemically with the partially used fixer (silver thiosulphate compounds) present in the emulsion.
The only known way to assure that adequate quantities of fixer will be available for complete fixation is to use a two-bath fixing technique. This technique is to be used with all types of black and white film and paper and is very simple to follow. Before proceeding however, we should briefly discuss the fixation of color materials.
Because of the delicate balance built into color films and papers, using a two-bath fixing technique with these materials may produce unpredictable and unwanted shifts in color. In order to avoid such an undesirable result, it is necessary to forego the two-bath fixing scheme with color materials and instead employ the fixation technique recommended by the manufacturer. This leads to a sometimes significant risk of impermanence due to the inadequate fixation which may occur when a fixing bath nears exhaustion. It is therefore advisable to strictly follow the film or paper manufacturer’s recommendations for the number of films or prints to be processed in any given quantity of fixer (bleach/fix), replacing the fixer often. Also be aware that small manufacturers wish their products to appear to be better than Kodak’s and other major brands, and therefore sometimes claim higher capacities for their products. Do not follow these recommendations as they will lead to inadequate fixation. Stick to the processing times recommended by Kodak, and preferably to their chemistry as well. Now back to black and white.
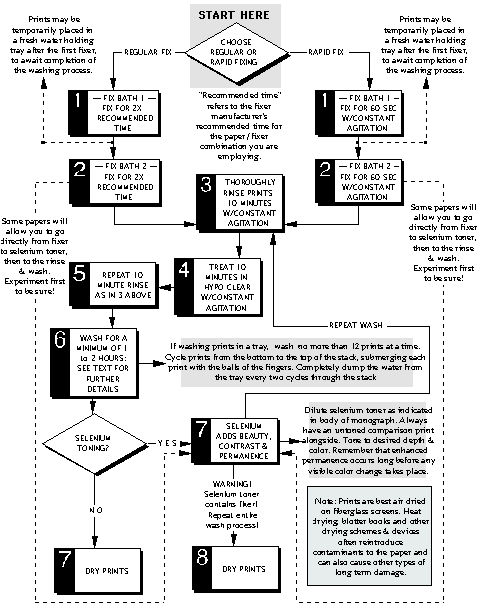
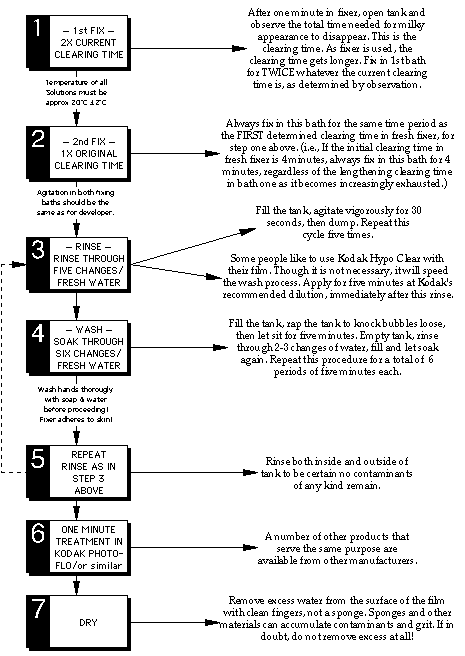
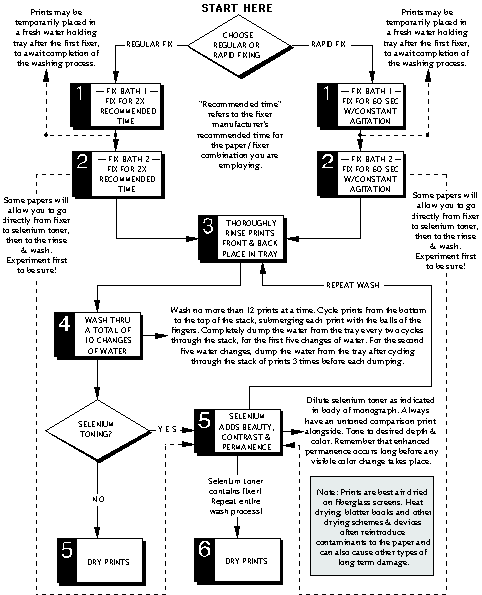
Instead of preparing only one fixing bath for each black and white process, prepare two identical baths. Label these Fixer 1 and Fixer 2. Never use them in the wrong order.
To fix film, first note the clearing time in fresh fixer for the film you are using. Remember, the clearing time is the amount of time necessary for the complete removal of the milky appearance of the film (After one minute in Fixer 1, tanks can be opened and lights turned on so clearing time can be observed without risking damage to the film.). Always fix for twice the clearing time in the first fixing bath and for the original clearing time in the second bath. As fixer number one is used, the clearing time will get progressively longer. Continue to fix for twice the clearing time until that time is double what it was originally. Then discard the first bath and replace it with the second. For example, if the clearing time is two minutes; fix for four minutes in the first bath and two minutes in the second. When the first fixer is partially exhausted and the clearing time is three minutes; fix for six minutes in the first bath and two minutes in the second. When the clearing time is four minutes (double the original clearing time); fix for eight minutes in the first bath, two minutes in the second and then discard the first fixing bath, replacing it with the second. Mix a fresh second bath.
Since clearing cannot be seen with papers, it is necessary to follow a slightly different procedure. Manufacturers recommend that a certain maximum number of prints be fixed per liter of fixer, based on the use of a single fixing bath. Using a two-bath fixer, one can safely double this number. If for example, the manufacturer suggests limiting use of a single-bath fixer to 25 sheets of 8x10 paper per liter, you can safely use the first fixer in a two-bath approach for 50 sheets of 8x10 paper per liter. After four changes of fixer, discard both baths and begin again with two fresh fixing baths.
Fix prints in each bath for the full amount of time recommended by the manufacturer for one bath fixation. If the manufacturer recommends five minutes fixation, then fix prints for five minutes in each bath for a total of ten minutes fixing time.
For fiber-based papers I use a very fast and effective two-bath variation of an Ilford fixing technique involving film strength rapid fixer.
A number of years ago Ilford devised a 30 second fixing approach for fiber-based papers. They used film strength fixer and vigorous agitation for 30 seconds. The theory was that this very strong fixer would quickly finish fixing the paper emulsion before the fixer had much opportunity to soak into the fibers of the paper base. Since less fixer would have soaked into the paper fibers, there would be less of it to wash out. The most difficult part of washing fiber-based papers is washing the fixer out of the paper base itself, rather than out of the emulsion. As a result, this method was very effective. However it had a couple of shortcomings, including the fact that after a certain number of prints were fixed, the bath was no longer capable of adequate fixation in only 30 seconds. The prints also had to be washed immediately, otherwise fixer carried over into a holding tray would have time to soak into the paper fibers, thereby nullifying the desired effect.
My method for fiber-based papers is very simple. Follow the same procedure recommended above for two-bath paper fixing, with the following exceptions. Use two negative strength rapid fixing baths (such as Kodak Rapid Fix or similar products made by other manufacturers). Do not use the hardener, usually provided in a separate bottle, as hardener tends to lengthen the wash process considerably. (If you find that prints are too easily damaged in washing, use half the recommended amount of hardener in each of your fixing baths.) Fix prints for one minute in each bath. As mentioned previously, the total number of prints that can be fixed by this method before discarding the first bath, is double the number of prints the manufacturer recommends be fixed in only one fixing bath. However, with these concentrated fixing baths the recommended number of prints that can be fixed per liter is usually higher than with normal strength fixers. Check the manufacturers instructions carefully. If you are making a number of prints and cannot wash the freshly fixed print immediately, rinse it thoroughly before placing it in a holding tray of fresh water.
Though the fixation procedures described above are no doubt more tedious than those to which you are accustomed, not following them can make washing a waste of time, because an improperly fixed print cannot be washed effectively.
One last precaution about fixation. Fixer used with film has a much higher silver content than fixer used for paper. As a result, fixer which has previously been used on film is often too silver laden to be effective on paper. Always keep separate sets of fixing baths for film and paper and never interchange them.
Except for fiber-based black and white printing papers, all currently existing photographic materials that have first been properly fixed, are easily washed. Because all types of film, and any papers made on resin coated stock have bases which are impervious to liquids, fixer is able to penetrate only the gelatin emulsion resting on top of these materials and not the film or paper base itself. Fixer does not adhere to a gelatin emulsion and is therefore easily washed from these films and papers. However, even though films and resin coated papers are not difficult to wash, they must be washed correctly or not all the contaminants will be removed.
Fiber-based black and white papers on the other hand (there are currently no fiber-based color papers) are not waterproof. These paper bases are easily penetrated by fixer which quickly adheres itself vigorously to the paper fibers. This makes it very difficult to wash these potentially destructive chemicals from the paper and requires an approach to washing which is substantially different from that used for materials made on a waterproof base.
The commonly accepted way to wash photographic materials is to subject them to large quantities of rapidly moving water. This is entirely incorrect! Fixer is not removed from film or paper by force, but rather by diffusion. If the concentration of fixer in the film or resin coated paper emulsion being washed is higher than in the surrounding water, fixer will diffuse out of the emulsion and into the water. The greater the difference between the concentration of emulsion held fixer and water held fixer, the more rapid the rate of diffusion. Washing a photographic emulsion with large volumes of water at high pressure will not hurry this process.
The correct way to wash film and resin coated papers is to first remove the excess fixer from the surface of these materials. This is done by rinsing them in several changes of water. After this excess fixer has been removed, the materials are soaked in still or slowly running water to give ample opportunity for the fixer contained in the emulsion to diffuse into the water and be removed. Roll film should be on reels and sheet film on hangers so that no surfaces are in contact with tank walls or other film, both of which would prevent adequate washing.
For film the procedure is as follows (I suggest using hangers and tanks for sheet film even if that sheet film was originally developed in a tray or by other means):
Fill the tank with fresh water, agitate the film vigorously for 30 seconds and dump the water. Repeat this procedure for five changes of water. Then fill the tank again, tap it hard to jar loose any bubbles that may have formed, and leave the film soaking in this still water for five minutes. Then empty the tank, rinse, fill with fresh water and again let it soak for five minutes.footnote 1 Repeat this process for a total of six – five minute soaking periods. Follow this by five more successive water changes with thirty seconds of vigorous agitation as described above, then hang the film to dry. (The temperature of the wash water must be ±2°C, the same as the processing solutions.) Treatment in a wetting agent such as Kodak PhotoFlo® is strongly recommended to avoid water spots and streaking.
Resin coated papers are usually washed in trays rather than tanks and therefore can’t be left to soak because they will adhere to each other, restricting diffusion. A slightly different approach is necessary. Use a Kodak tray siphon or other means to introduce fresh water into the washing tray. Rinse the prints, front and back, in gently running water in order to remove excess fixer from the print surface, before placing them in the wash tray.footnote 2
Agitate prints in the wash tray by removing prints from the bottom of the stack and placing them on top, submerging them with your fingers. Cycle through the stack of prints this way two times, then dump the water. Repeat this agitation/dump sequence four more times. Then start the entire procedure again, cycling through the stack of prints three times before dumping the water, repeating the sequence four more times. Dry.
Fixer is removed from the emulsions of fiber-based papers just as easily as it is from resin coated papers or from film. The problem with fiber-based papers is the large content of fixer contained in the paper base itself, much of which is fiercely adhered to the paper fibers. Removing this stubborn fixer from the paper base requires long soaks and some chemical assistance. Fiber-based papers are worth the trouble because they can produce images far more beautiful and longer lasting than resin coated papers. However, if you are not willing to wash these papers properly, you might as well not use them.
The first step to washing fiber-based prints, after proper fixation, is a ten minute rinse. This rinse is no causal step. If not done correctly and efficiently, the remainder of the wash process will be ineffective. This step should take place in a tray at least one size larger than the prints being washed. 11x14 for 8x10 prints, etc. Use a Kodak tray siphon or other device to introduce fresh water into the tray.
As described under resin coated papers, prints should be kept in constant motion, moving one print at a time from the bottom of the stack to the top, submerging each print with the fingers. After three times through the stack, dump the water completely and refill the tray. (It is vital that the water be completely dumped. Simply replacing it by using the siphon or other running water washing device is not sufficient. More on this important point later.) No more than a dozen prints should be rinsed at any one time. If you have any doubts about the efficiency of your rinse, double the time. The extra ten minutes won’t cost you much time in the overall scheme of print processing, but could make a big difference in permanence. This rinse removes almost all of the fixer from the paper surface and a large portion of the fixer which had soaked into the paper. You are now ready to proceed with the next phase of washing. Remember, if this rinse step is not done correctly, the next phase of washing and all subsequent steps, will be ineffectual!
Simply washing fiber-based papers is not enough, because a significant and eventually damaging amount of fixer is adhered to the paper fibers and cannot be removed even if washed for days. Something must be done to break those stubborn chemicals free from the paper fibers.
Many years ago it was observed that prints washed in sea water were freed of argentothiosulphates (fixer combined with silver) much more efficiently and more quickly than prints washed in fresh water. After some investigation it was found that the sodium sulfite content of sea water was the agent responsible for the improved washing. Sodium sulfite not only speeds up the wash process, but also makes it possible for a greater percentage of the paper’s total fixer content to be removed. Sodium sulfite allows more fixer to be removed faster — much faster — thereby providing a vastly superior print wash.
Sodium sulfite is available from Kodak as a product called Hypo Clear (this product may contain other chemicals that also encourage the wash process). Mix Hypo Clear as per the package instructions and treat prints for a total of ten minutes (Kodak and other manufacturers of similar products recommend 3 minutes. However recent studies conducted by David Vestal and others have shown that a 10 minute treatment is substantially more effective and I strongly recommend using this time.) Make sure you have enough solution to easily cover all prints, again in an oversized tray, and agitate as described above for the rinse. After this treatment in Hypo Clear give the prints another 10 minute fresh water rinse, exactly as described before. This rinse is just as important as the first one!
If you live near the ocean, do not be tempted to use sea water. It contains other substances which are not as beneficial to the photograph. However, if you do not have access to Kodak Hypo Clear, you can make you own sodium sulfite bath by dissolving 10 grams of sodium sulfite per liter of water. Do not use this home made bath with films.
Sodium sulfite is marketed for print washing purposes by a number of other companies in addition to Kodak. They are usually called washing aids or hypo eliminators. All of these products, despite some rather incredible claims, are roughly the same as the Kodak product and should be used in the same way as described above. Do not believe the outrageous claims made by these manufacturers concerning wash times or anything else. Following their instructions will lead to very poorly washed prints indeed.
As stated above, some of these products are called “Hypo Eliminator” by their manufacturers. This is a misuse of the term, as there are no commercially packaged hypo eliminators on the market. There is a very substantial difference between a hypo clearing agent and hypo eliminator. Hypo eliminator is a solution that actually destroys fixer so that it can be washed from paper completely. It is made from ammonia and hydrogen peroxide and produces a gas which makes it impractical to prepackage hypo eliminator for commercial sale. I will discuss hypo eliminator in more detail later in the article.
After having given prints correct fixation, a 10 minute rinse, 10 minutes treatment in Hypo Clear, and a second 10 minute rinse, we are ready for the final wash. There are two ways to proceed with this wash.
The first and most economical way is by using the same tray and water source used for the 10 minute rinses mentioned above. However, this method is time consuming and very tedious as it requires the presence of the photographer for at least an additional hour!
The second method uses a device called an archival print washer. Archival print washers are somewhat costly (between 500 and 700 dollars), but make print washing much easier, and free the photographer to attend to other things while the prints wash.
Whichever of the two methods is to be used, the goal is the same. The small but significant amount of fixer remaining in the paper at this point is adhered to the paper fibers and can be removed only by a long soak in fresh water. Large volumes of wash water under high pressure will be of no help. What is required is that the fixer be given time to diffuse out of the paper and into the surrounding water. In order for this to occur, several factors must be present. First there must be reasonably fresh water surrounding the print. If there is just as much fixer in the surrounding water as in the print, there will be no diffusion. Second, the paper must be exposed to water at all points and not stuck to other prints or the walls of a tray or tank. Thirdly, there must be no bubbles on the surface of the print. Where there are bubbles there can be no diffusion. And finally, there must be periodic, complete changes of water.
From the foregoing discussion it is obvious that we cannot simply put prints in a tray and change the water from time to time. Prints would stick together, form air bubbles on their surfaces and would not be exposed to sufficient fresh water. Washing would be very poor indeed.
If prints are to be washed in a tray it is absolutely necessary that the photographer keep the prints in constant motion. Prints must be agitated exactly in the same manner as previously described, constantly removing prints from the bottom of the stack, placing them on top, and submerging them with the fingers. Every five minutes all the water from the tray should be dumped, the tray refilled and agitation begun again. This point is vital.
It is absolutely not sufficient that water be running into and out of the tray throughout the wash. This is both an unnecessary waste of water and an ineffective washing technique. The longer a running water wash is used without dumping all of the water, the more inefficient the wash becomes. This is because all of the fixer-containing water is never removed completely by this method, allowing the concentration of fixer in the surrounding water to grow in relation to the amount of fixer in the print, thereby limiting diffusion. Because a running water wash never removes all of the fixer contaminated water from the tray, it does not take long before very large quantities of water must be used in order to achieve only a small amount of additional washing. Again, remember to dump the tray completely every five minutes.
This tray wash sequence of five minutes agitation, dumping all the water, refilling and agitating again for five minutes, must be kept up for one hour with a water temperature of approximately 20&Mac251;C and no more than a dozen prints in the tray (More prints will not just make the wash take longer. With more than 12 prints, the wash will probably not be successful no matter how long the wash time.). If this sequence is followed efficiently, one hour’s wash should be sufficient. If you have any doubts, continue the wash for another 30 minutes. At the end of this wash there will still be a small amount of fixer contained in the paper, but it would require hours of washing to remove only a small percentage of it and this small amount of fixer can actually be beneficial to the photograph as will be explained later.
Washing prints in a tank made specifically for this purpose, while not necessarily more efficient than the tray method, is certainly a lot easier on the photographer. An archival print washer looks like a large fish tank with partitions. Between these partitions are chambers designed to hold only one or two prints. Aerated water is introduced through holes in the bottom of the tank and flows up over each of the prints. Prints are suspended in the center of each chamber by the water/air mixture flowing over them. The water flow prevents them from sticking to the walls of the washer and the rising bubbles in the water remove bubbles adhered to the print surfaces before they can interfere with washing.
If using an archival print washer instead of a tray, the washing sequence is as follows: 10 minute rinse, 10 minute treatment in Hypo Clear, 10 minute rinse, place prints in print washer. Leave the prints in the washer for one hour with only the minimal water flow necessary to keep the prints from sticking to washer walls and from forming air bubbles on their surfaces. During that hour, dump all the water in the tank and refill it, every 10 to 15 minutes. Again, if unsure, extend this wash an additional 30 minutes. Half-way through the wash, always, move all of the prints to different chambers. Print washers always wash more efficiently in some chambers than in others, though the difference is usually slight. Moving prints in the middle of the wash eliminates any risk from these differences.
Another method used with print washers is to place the prints directly into the washer from the Hypo Clear bath, without a rinse. The rinse is then done in the archival washer by setting a vigorous water flow and dumping and refilling the print washer every five minutes, for a total of 30 minutes. Then proceed with the wash described in the previous paragraph.
Having an archival print washer is without a doubt the ideal way to approach print washing. However, getting an archival washer that will actually do the job it is supposed to do is not so easy. There are about six archival print washers currently on the market. All but one were apparently designed without benefit of current information about print washing, because only that one is capable of providing the kind of wash described in this article. (Photographic equipment has always been notorious for poor design, so I guess we should be grateful we have one washer available that can do the job rather than none.)
Fortunately, the one washer correctly designed for print washing is very well designed indeed and does the job exactly as needed. It is manufactured by an American company called Salthill and is called the Cross Current Archival Washer. This is the only print washer made that performs every part of the washing job exactly as I have described it, including the extremely important frequent “dumping” of its entire water content. No other washer has this quick dump feature which allows all the water to be emptied from the tank quickly (in one minute and 20 seconds or less, depending on whether one is using the 11x14 or 16x20 model). Without this quick dump feature, an archival print washer is almost useless. For more information on the Salthill Cross Current Archival Washer, or for a catalog, contact:
Sadly Salthill has gone out of business. It's products were simply too good and too finely crafted to appeal to a wide enough audience for continued survival of the company. If you can find their products used, pay whatever price is asked. They are worth every dime. (DCK 4/1/99)
Most types of toning severely damage a photograph’s permanence. A few, such as sepia toning and selenium toning, enhance it.
The reason for mentioning toning in this article is that selenium toning (and some types of sepia toning), the most popular type of toning used both for enhancing the longevity of a photograph and for its unique beauty, significantly changes our approach to washing.
Rapid Selenium Toner is available from Kodak. It is provided as a liquid which is usually diluted from 1:3 to 1:25. Prints are toned anywhere from 3 to 25 minutes depending on the tastes of the photographer. With normal cold tone photographic papers, selenium provides a subtle but pleasing color change to a purple–black (with warm tone papers selenium produces a very bright red color that most people find objectionable), a rewarding increase in the contrast of the blacks of a photograph, and substantially increased (perhaps by centuries) longevity. Most experts do not consider toning to be an option for important prints. They consider it to be a necessity. Here is why.
The silver content of a photograph is not stable. Just as the silverware in your dining room cabinets can become tarnished, so can the silver of a photograph be destroyed by oxidation and reaction with chemicals in the air. Toning converts the unstable silver image either to another metal or a compound of silver with another metal. In the cases of both sepia and selenium toning, the new compound (either silver sulfide or silver selenide, depending on the toner employed) is far less susceptible to oxidation and deterioration over time.
Selenium toner (and most sepia toners that do not work by the bleach and redevelop method) contains fixer. Therefore, after toning, a print is not ready for washing because it has had fixer reintroduced by the toner and therefore requires the entire washing procedure to be repeated. Here is the sequence of toning and washing steps to be taken after development if a toner containing fixer is to be used with fiber-based prints.
For all sepia toners that are not bleach and redevelop toners, follow the same procedures as above, unless you are certain they do not contain fixer. For bleach and redevelop sepia toners follow these steps: rinse, Hypo Clear, rinse, tone, rinse & wash.
If selenium toning resin coated papers, wash as usual, tone and then repeat the wash for resin coated papers. Do the same when sepia toning these papers.
Some photographers follow a shortened version of the above procedures for selenium toning fiber-based prints. This procedure may or may not permanently stain your photographs, depending on what type of paper you use, so try it with unimportant prints before risking important photographs. The procedure is to move prints directly from the second fixing bath into the selenium toner without any sort of wash or rinse in between. Tone to the desired degree. Then move directly from the toner to the first ten minute rinse, Hypo Clear, rinse again, and wash as discussed before. This is the approach I use. The procedure saves a lot of time, but may not work for you. Be sure.
How can you be certain your washing techniques are adequate? A correctly washed print looks no different from a print that hasn’t been washed at all, so how is one to know whether all this effort has had the desired result? The answer is simple.
Kodak sells a residual fixer test kit called HT-2 consisting of a couple of bottles of silver nitrate/acetic acid solution which can be easily used to test the remaining fixer content of prints (You can make your own by dissolving 10g of silver nitrate in a liter of water containing 30 ml of glacial acetic acid.footnote 3 Store this in a dark brown glass bottle and do not expose to sunlight.). A few drops of this solution are placed on the print’s surface and left there for two minutes. The print is then rinsed off, and any stain left on the print by the test solution is then compared to a chart. Though Kodak describes different degrees of permanence for different levels of stain; for serious purposes any stain at all means insufficient washing.
Wash a number of test prints (unexposed paper placed directly into fixer) by the methods described in this article. Periodically pull prints from the wash and test them with HT-2. Find the time it takes for all the test prints to be free of new stains (if using an archival washer, remember that different chambers will wash with varying degrees of efficiency), and then use twice that time as your standard wash time. The reason for doubling this time is that the HT-2 test is not sensitive to small amounts of fixer. Further washing is still required even after no new stains appear. HT-2 stains are permanent, so be sure to test only paper processed specifically for this purpose.
Earlier in the article I mentioned hypo eliminators and the fact that products labeled as such are actually washing aids like Hypo Clear and are not really hypo eliminators. Hypo eliminators destroy residual fixer by converting it to sodium sulfate, making it simple to wash from the paper. However, they cannot always be used. Here’s why.
Recent research has shown that removing absolutely all of the fixer from photographic papers can be detrimental. This is one of the reasons that resin coated papers tend not to last long. It is easy to wash all of the fixer from these papers, making them susceptible to damage.
Regardless of how carefully washed or for how long, it is virtually impossible to wash the last tiny amounts of fixer from fiber-based papers. It would appear that the inability to remove all fixer from fiber papers has actually been beneficial because it has been discovered that this tiny amount of fixer tends to coat the surface of the silver grains in a photograph, providing it with some degree of protection from the assault of oxidizing agents and other destructive elements in the environment. If hypo eliminator is used on fiber-based paper, all of the residual fixer will be removed and the paper will no longer be protected. So do not use hypo eliminator, unless ..........
Papers toned in sepia or selenium no longer need the protection afforded by residual amounts of fixer left in the paper, and could actually benefit from the removal of those small amounts. If you wish to use hypo eliminator with toned prints, the formula is as follows:
To use, remove prints from the wash tray or tank, half way through the wash, treat them in hypo eliminator for 10 minutes (agitating the same way as for all other steps in the process), then wash for an additional 20 minutes with frequent water changes. Kodak recommends only a six minute treatment in hypo eliminator and a ten minute wash afterwards, but I believe the extra time is beneficial. The capacity of this hypo eliminator bath is 12 – 8x10 prints per liter. Do not exceed this limit. Also, do not store this solution or reuse it. Mix it just before use and discard it immediately. It produces a large quantity of gas that will soon explode any sealed container in which it is stored. Be sure to use this bath only in a well ventilated area.
Proper fixation, toning and washing go a long way to ensure a photograph’s permanence, but they are far from the only factors involved. The permanence of a photograph is also affected by the way it is dried, flattened, mounted, matted, framed, stored and displayed. A future article will deal with proper techniques for doing all of these things without damaging the photograph or shortening its life.
David Kachel