Are You Using the Wrong Film Speed?
Why Traditional Testing Methods Are Flawed
©Copyright 1996 thru 2008 David Kachel
Article Has Never Been Published. This has previously only been used for workshop instruction.
In every workshop I teach, I make it a point to ask each student about their experiences in other workshops. I do this to improve my own workshops by learning from the successes and mistakes of others. One of the most common complaints I hear from workshop students concerning approaches to the Zone System they have learned elsewhere is that once they have completed their Zone System calibration efforts and begun shooting negatives in earnest, they have been disappointed with their results. “My negatives still weren’t any better,” is a refrain I hear quite often.
Though this singular complaint usually has a multitude of underlying causes, ONE cause stands out above all the others — The method taught for determining film speed.
Before I go any further with this, I ought to clarify something I feel is very important:
The fact that I am writing an article about film speed determination may lead some readers to mistakenly assume that I am lending support to a widely held misconception about the Zone System — this misconception being that the Zone System is primarily concerned with finding “your film speed” and “your development time,” as is often implied in so many Zone System books and articles. This is not the case.
The Zone System is about informed visualizationfootnote 1 and the tools necessary to carry that visualization to completion. Determining your film speed and development time (also known as calibration), though certainly important, is such a minor pursuit when compared to the whole of the Zone System, that it should be downplayed as much as humanly possible. In fact, compared to the totality of the Zone System, calibration becomes almost (not quite) insignificant. Within limits, one could indeed apply the Zone System very effectively without ever calibrating at all!footnote 2
Having put calibration into proper perspective, let’s get back to the subject of film speed.
There are a wide variety of methods for determining film speed for Zone System purposes. Some involve using stepwedges, others shooting pictures of gray cards, still some others recommend you take photographs of the side of a building. Most of the current Zone System calibration methods however have one thing in common — they recommend basing film speed on a fixed Zone I density. Most often, the Zone I density sought is .10 over base + fog.
On the surface, this approach seems logical. After all, the generally accepted rule is that .10 over b+f is the first consistently printable negative density. That is, it is the first negative density that can be visually distinguished in a print as being somewhat lighter than the black produced from a Zone 0 negative density. And in fact this is true.footnote 3 A Zone I density lower than .10 over b+f is unlikely to print as a distinguishably different tone from that of a Zone 0 negative density, if that Zone 0 negative density is indeed printed as a Zone 0, black print tone.footnote 4 However, it is not logical to jump from this observation to the conclusion that .10 over b+f is a valid reference point for testing film speed.
Despite the fact that it is more or less reasonable to define a Zone I negative density as .10 over b+f, it is not reasonable to base our film speed determinations on this. Only under certain circumstances, such as when the subject is classed as Normal and will therefore receive Normal development, is this approach valid. Even then, it is only valid occasionally, and not for all Normal subjects. To base film speed on a fixed Zone I density is to completely ignore what is happening in Zones 0, II, III and IV, which is to court disaster.
OK, perhaps a little elaboration and clarification are in order.
The idea behind the traditional way we approach film speed calibration (.10 over b+f) is to base our speeds on the minimum densities that will just render the very darkest tones, Zone 0 and I, properly in a print. This is all well and good, except for the fact that, paradoxically…
In the field we generally base our exposures on Zone III, sometimes on IV, seldom on Zone II and virtually never on Zone I! (There’s nothing wrong or misguided with basing exposure on any Zone you desire. But although basing an exposure on Zone I, may at times be rational, it is very uncommon practice indeed.)
The logical flaw involved here should now be apparent. We base our film speed tests on Zone I, but then go into the field and base most of our exposures on Zone III. Then when we make a print, we look to Zone III shadows to determine whether or not exposure was adequate. Never, ever do we look at Zone I shadows for this purpose! It makes no sense to base all of our film speed tests on one Zone (I) and all of our actual exposures on another (III).
If we base our calibration tests on Zone I, then we should also base our exposures on Zone I in the field. Unfortunately, this is impractical for a number of reasons, not the least of which being that Zone I areas of the subject are usually quite small and difficult to meter adequately. In addition, basing exposures on Zone I could very often lead to inadequate Zone II, III and IV detail because — if we base exposure on a Zone I tone, another, more important tone we wish to have on Zone III, may not fall there.
The options are either to continue with the clearly irrational approach of basing tests on Zone I and exposures on Zone III, or to alter our approach to film speed testing and begin basing our speed tests on the same Zone on which we usually base exposures — Zone III! This is the approach I will recommend here. But before we get too far ahead of ourselves, lets take a look at some other reasons why basing film speed on Zone I is illogical…
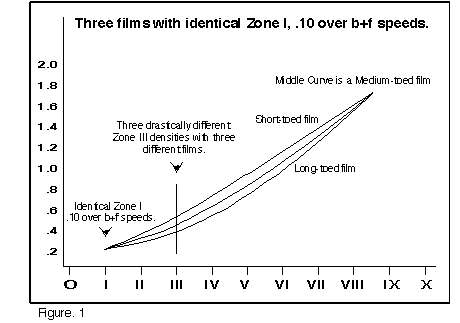
Figure 1 represents three hypothetical films having the same density range, which we shall stipulate as being “Normal.” They represent short-toed, medium-toed and long-toed films, all exposed to the same scene. In each case we have exposed for a Zone III subject reflectance based on a Zone I film speed of .10 over b+f. For ease of understanding we shall assume that all three films have exactly the same speed as determined by a Zone I density of .10 over b+f, and therefore all three curves intersect at this (.10 over b+f) point.
As you can see from the varying densities for Zone III in each curve, basing film speed on Zone I results in a significant difference in Zone III density and contrast for the three films — and therefore in the appearance of the shadows in the eventual final print. Each negative will produce shadow density and contrast significantly different from the others. Obviously, we are likely to prefer one over the other two, and therefore the .10 over b+f speed determination would provide less than optimal results with at least two of the three films.
In Figure 2, I have shifted the curves from Figure 1 so that all three intersect at the same Zone III density. This is, after all, the desired result if we base negative exposure on Zone III — to have a Zone III exposure consistently produce the same density in each negative.footnote 5 As you can plainly see, in order for the three films to produce the same consistent density for Zone III, their speeds at Zone I are no longer the same. One becomes in effect, a slower film, another faster. Therefore, if we desire a consistent density for the Zone on which we actually base our exposures (Zone III), then the .10 over b+f concept for film speed is obviously useless.
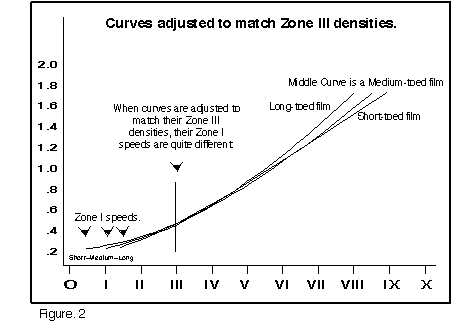
Figure 3 illustrates a lower CI curve such as is produced with contraction negatives. With contractions, an increase in exposure is of course required. But if you provide only enough increase in exposure to maintain Zone I at .10 over b+f, the result is a Zone III density that is much lower than may be logically desired for Zone III. Instead, even more exposure is needed to move a Zone III subject tone up to a negative density that is adequate for printing. Obviously, a film speed based on a Zone I density of .10 over b+f is not applicable to contraction negatives.

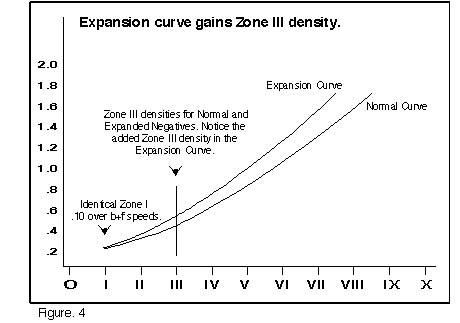
Figure 4, a higher CI curve such as might be produced by expansion, shows that with expansions, reducing exposure only enough to maintain Zone I at .10 over b+f (the traditional recommendation) results in a Zone III density that may be too high, providing shadows that are perhaps too contrasty. A still greater decrease in exposure may be required here to bring Zone III in line. You may think this would make Zone I unprintable, since its density might then be lower than .10 over b+f. However, due to the increased contrast resulting from expansion in this part of the characteristic curve, it is easier to separate Zones 0 and I in a print and therefore, a Zone I density lower than .10 over b+f can often be effectively printed from expansion negatives. From this it is plain that a film speed based on a Zone I density of .10 over b+f doesn’t work for expansions either.
In a later section, I’m going to tell you how to successfully test for an “average” optimal Zone III film speed. But first, you may wish to know — Why do I refer to an “average” optimal speed, and not just an “optimal” speed?...
Because the optimal speed of a film varies, depending on the subject!
(Did I hear someone out there mutter, “Get a rope?”) Yes, you did understand correctly — optimal exposure is as much a function of the subject being photographed as it is of the chosen film and development scheme. Because of this, there is no optimal speed that fits every Normal subject. Neither is there an optimal speed for every N+1 subject, or for any other N group. Optimal film speed can be, and usually is, different from one N subject to the next, or one N+2 subject to the next, etc. There are five basic ways in which optimal film speed for Zone III shadowsfootnote 6 can be shifted by the subject itself.
Numbers 3 and 4 above require a little explanation…
One of the reasons for the existence of the Zone System is the observation that a conventional, non-Zone System exposure, based on an average reflectance reading of the overall scene, can leave shadows and highlights with too little or too much density. An average reading of a subject with a too-long reflectance range for example, can leave important shadow tones exposed too low on the Zone scale (and highlight tones exposed too high).
In Zone System practice there is a similar price to be paid for basing exposure on Zone III. When we place a subject reflectance on Zone III, we are often making the same mistake mentioned above, on a smaller scale. Very seldom do we take the time to measure subject reflectances lower than the tone which we have placed on Zone III, to see where they fall.footnote 7
With some subjects, there may not be any tones that fall lower than Zone II or I. This produces short-reflectance-range shadows, which may appear flat and muddy in a print. With other scenes, there may be one or two important subject reflectances that fall lower on the Zone scale than we might like. This results in long-reflectance-range shadows, which may appear contrasty in a print. The subject of short and long reflectance range shadows is another topic that could occupy an entire article of its own, but again, it is enough at this point that we know it happens.
There are quite a number of other factors, not related to the subject itself, that can also alter your optimal film speed from one photograph to the next… such as the contrast of your lens, flare, filters and any number of other things. The point of this section is primarily to illustrate just how much of a moving target optimal exposure is, and how important the need is for a film speed determination method that gives best overall results for the way you work and the kind of subject matter you photograph, in light of all these difficult-to-control variables.
Many of us who teach and write about the Zone System have gotten overly enamored of our densitometers. We have made the mistaken assumption that because we can measure densities and plot curves (things I encourage students not to waste time on), a carved-in-stone density for Zone I (or II or III) can be declared. This is at best an unfortunate illusion (or should that be delusion). Whether or not the density for any Zone is adequate can be judged only in light of the relationship between it and the densities of adjacent Zones, and more importantly, how it actually looks when printed!
We should never be interested in establishing a set density for a given Zone. That is counterproductive. Instead we must ask ourselves, “As photographers, what do we really want?” Do we want Zone I exposures to produce a density of .10 over b+f, or Zone III exposures a density of .35 over b+f? Or, do we really just want negatives that produce a specific level of tone and contrast in the shadows of our prints? Obviously, we want the latter. (Remember, we’re talking about exposure only. Tone and contrast for higher Zones can wait for another article). We don’t really care what the density for a Zone III shadow is, as long as it prints the way we want it to. This is all that genuinely matters.
By now you should be in the market for a new approach to speed testing. In looking for a new method, you might have been tempted to retain some of the “old school” approach by simply declaring a “standard” density for Zone III, such as .35 over b+f, and testing for that rather than for a standard Zone I density of .10 over b+f. But, as you learned in the previous section, just because we’ve achieved a predetermined density, doesn’t mean it will look good in a print. Whether or not a Zone III density is “correct” hinges to a great extent on the relative densities of Zones 0, I, II and IV. If the densities of Zones adjacent to III, (II and IV) are too similar, such as is the case with most contractions, low-local-contrast shadows and short-reflectance-range shadows—shadows will be flat in the print. If they are too divergent, as with some expansions, high-local-contrast shadows and shadows with a too-long reflectance range—shadows may be too contrasty in a print.
In the final analysis, the only true test of film speed is not a densitometer, a gray card or a stepwedge…it is the answer to this question: “How do the shadows look in a print?” If they look good, then your film speed is correct. If they do not, then no matter how precisely determined, your speed is wrong!
Despite all the technical gibberish and pseudo-science that occurs in photography in general and in the name of the Zone System in particular, just about everyone can agree on two things…
In addition to the above two general points of agreement, I feel that in this article I’ve solidly established the following two truisms…
For the sake of brevity, what follows is an abridged description of only the film speed testing half of the calibration process I normally teach to students. In actual practice, I teach students how to test for development time and film speed, simultaneously, and with the same negatives. If you are interested in learning about the whole process, see "Zone System Calibration."
Since the only true test of film speed is the appearance of shadows in the print, obviously we must make real prints in order to test for film speed.
And because optimal film speed varies from one subject to the next, we must make prints from real negatives, of real subjects, in order to see which film speed gives us the best looking shadows, most frequently. Stepwedges and artificial test targets, regardless of type, simply won’t do.
As with any other testing method, speeds for different N numbers (N-2, N+1, etc.) must be tested separately. You will (obviously) get a different optimal speed for N+1 subjects than you do for N subjects, etc.footnote 8 Be sure to test for only one N # at a time.
The goal with this approach to testing is to find an average film speed for each class of subject (N+, N-, etc.) that gives optimal results for the majority of subjects in that class. That is, for subjects you categorize as Normal, you will have one optimal, average film speed. For each N+1, N-2, etc. class of subject, you will have a distinct optimal, average film speed.
It is important to keep in mind that this approach to calibration is designed not to interfere with, or interrupt your normal work flow. Simply follow your usual working habits, shooting only real subjects you would have photographed anyway — the only difference being that you will shoot some extra negatives for testing purposes.
If you are testing film speed for N subjects, then for each N subject for which you base exposure on Zone IIIfootnote 9 shoot a bracketed series of negatives one and a half to two stops, in half stop steps, on either side of your starting film speed. For this approach to be effective, you will need at least a dozen sets of bracketed negatives from as many different scenes, so that you can average your results later. The reason you need to average results for a number of different scenes is, as previously mentioned, because optimal film speed is going to vary from one subject to the next, and because you want a large enough sampling so that errors with individual subjects do not have a significant influence or your results. If this sounds a little tedious, remember that you should not be shooting test negatives, but rather, real negatives of real subjects you would have photographed anyway.
If you are testing an ISO 400 film, then as discussed earlier (see Footnote #2), you should start with a presumed EI of 200 and therefore bracket shots at EI’s of: 75, 100, 150, 200, 300, 400 and 600.footnote 10 This puts your most likely film speed in the middle of the bracketed range. If you are uncertain, add another bracketed shot at either end, at EI’s of 50 and 800. (Experienced Zone System photographers can judge film speed quite effectively just by looking at bracketed sets of negatives, thereby bypassing many of the steps here. For the beginning and intermediate Zone System photographer however, this method is very effective and at the same time is a tremendous learning experience.)
Make a small print from each of your bracketed negatives on grade 2 paper.footnote 11 (The reason for grade 2 paper is simply to have a consistent set of results and to target negatives at a medium contrast paper — not because there is anything sacred about grade 2 paper.)
Print each negative in the bracketed set for best shadow detail, ignoring the appearance of highlights. Start with the least exposed negative and work your way up to the most exposed. Try to approximately match the density of the shadow areas in each print and remember that you are trying to get a Zone III tone. The first time or two that you do this, you may have to go back and reprint one or two of the negatives so that all of the Zone III prints approximately match in tonality.
When all the negatives from a bracketed series have been printed, look at the prints in order, from the print made from the least exposed negative to that made from the most exposed negative. You should see a steady, yet usually subtle improvement in Zone III image quality from print to print, until you reach the print made from the negative that received optimal exposure.
Once you have printed the negative that provides optimum exposure, the remaining negatives in your bracketed set, those having had even more exposure, will usually not provide prints with shadow detail that is significantly any better. That is, if the best speed for your subject with an ISO 400 film is EI 200, then the EI 300, 400 and 600 negatives will not produce shadows that look as good. But the EI 150, 100 and 75 negatives should all produce shadows that look largely just as good as the EI 200 negative. The idea is to find the fastest speed that will produce shadows that are not significantly improved upon by additional exposure. Make a note of the optimal speed for this particular subject.
Now go on to the next Normal scene for which you have a bracketed series of negatives and print those the same way. Don’t be surprised that you get different optimal film speeds for each Normal subject. This is to be expected and is the reason a number of subjects must be tested and their results averaged, before any meaningful information is derived.
Here are some of the things you will notice that may surprise you:
When you have printed the bracketed negatives from a number of different Normal (or N+ or N-) subjects and are ready to determine your average, optimal film speed for that N#, disregard one each, of the highest and lowest results, then average the rest. If necessary, round the result to the next slowest third or half stop speed, as you prefer. For example:
|
|
|
|
|
|
|
|
|
|
|
|
|
|
|
|
|
|
|
|
|
You now have an average film speed for N, or whatever N# for which you were testing, which you know to be the optimal average speed for the kind of subject matter you photograph and for the way you work, because you arrived at this conclusion by judging the appearance of shadows in real prints, from real negatives of real subjects.
Now you can move on to the next N# class of subject you wish to test for an optimal, average film speed. Do not however, waste time testing for contractions greater than N-2 or for expansions greater than N+2. It is impossible to calibrate meaningfully for expansions and contractions beyond this range. Why? Well…
That’s the subject of another article.
David Kachel
1. Informed
visualization is a term of my own invention. Even the beginning snapshooter
with no knowledge of photography at all, visualizes the final photograph when
taking a picture. The difference between the snapshooter and the professional
is that the snapshooter’s visualization usually has little to do with
the reality of what is in front of the camera and what is physically possible.
The Informed Visualization of the skilled Zone System photographer on the
other hand, is visualization based on a thorough understanding of one’s
tools and materials, and of what is or![]() is not possible to produce.
is not possible to produce.
2. I strongly
encourage readers not to let anyone make a mystery of, or create a mantra
from “your film speed,” or “your development time.” It
is hardly a secret that the vast majority of expert Zone System photographers
end up using a film speed that is approximately half the manufacturer’s
recommended speed. If you start testing at this point (EI 50 for ISO 100 films,
EI 200 for ISO 400 films, etc.) you will already be very close to your most
likely results. Likewise, most Zone System photographers end up using a development
time that is roughly 70% (for non-T-grain films) to 80% (for T-grain films)
the manufacturer’s recommended development time. Starting with![]() such a time will put you very much in the ballpark at the outset.
such a time will put you very much in the ballpark at the outset.
3. Densities
smaller than .10 can be measured and are easy to distinguish visually in a
negative. However, just because you can see a density in a negative, doesn’t
mean you can print it. For a Zone I density to be printable, it must produce
a black distinguishable from that black which is produced by an area of the
negative representing one full stop less exposure (ie., Zone 0). Densities
lower than .10 over b+f can be seen a![]() nd
measured, but not easily (or at all) printed.
nd
measured, but not easily (or at all) printed.
4. It is important
to keep in mind that the negative density for Zone 0 is not – 0.00 over
b+f, but rather something marginally less than whatever the density may be
for Zone I. eg., if the density for Zone I is .10 over b+f, then the actual
density for Zone 0 is likely to be something on the order of .06 or .07 over
b+f. Likewise, a Zone 00 density will be roughly .03 to .04 over b+f. There
is in fact an entire section of characteristic curve beneath Zone I that can
provide a lot of very useful information, not the least significant of which
is the fact that correct Zone I density depends on the relationship between
the densities of Zones 0, I & II and the contrast in that part of the
characteristic curve. For some negatives, a Zone I density of .10 over b+f
may print distinguishably from Zone 0, for others it may not. In still some
others, a Zone I density lower than .1![]() 0
over b+f may yet be printable.
0
over b+f may yet be printable.
5. Over the
years I’ve learned never to underestimate my readers. Some of you have
no doubt already spotted the minor flaw in this logic, and you are correct
— it is not sufficient to just have the same density. Other factors which
will be covered ![]() further
on in this article, also come into play.
further
on in this article, also come into play.
6. I define
shadows in this context as, whatever tones you are exposing on Zones 0 through
IV, regardless of whether or not they are actually in “shade.”
![]()
7. The logical
conclusion from this would of course be to base exposures on Zone I. But,
as mentioned previously, this is impractical for a variety of reasons.
![]()
8. Zone System
photographers have always gotten different speeds for different N numbers.
But we have always based the new speeds on the same Zone I, .10 over b+f assumption.
Now we are basing altered film speed on the appearance of Zone III shadow
detail and contrast in the print. You will find significant differences in
the speeds you obtain for expansions and contractions by this method as compared
to the old .10 over b+f approach. For example, using one of my SLIMT bleaches
with T-Max 400 and processing to N-2, I achieved a speed loss of zero when
I based speed on a Zone I density of .10 over b+f. Using the same film and
processing method, but ![]() basing
my EI only on the appearance of Zone III shadows in the print, I instead got
a speed loss between one-half and one stop.
basing
my EI only on the appearance of Zone III shadows in the print, I instead got
a speed loss between one-half and one stop.
9. For purposes
of these tests, do not include subjects for which you based exposure on some
other Zone… photograph them of course, simply don’t include th![]() em
in your tests.
em
in your tests.
10. When testing
for expansions, use a starting speed a half-stop faster. ![]() For
contractions, use a starting speed a full stop slower.
For
contractions, use a starting speed a full stop slower.
11. When testing
speeds for contraction negatives, test on grade 3 paper, rather than grade
2. For reasons too involved to discuss here, contraction negatives should
all be aimed at grade 3 papers to compensate for the diminished local contras![]() t
produced by contraction.
t
produced by contraction.
12. Strictly
speaking, this approach is mathematically flawed. Obviously, the correct average
film speed for the example shown is 200, not 210! However, the inherent mathematical
error is too tiny, in all cases, to be meaningful and therefore it makes more
sense to use this simplified approach, rather than a more “purist”
math.![]()